


Domus.Cad 24.3.3
Differences from 24.3.2
Fixes and improvements
- Fixed a copy and paste quota issue. Before the size was smaller than the original
- Import 3D models Obj also imports textures with the correct UV mapping
- Removed the bounding box of point clouds in 3d
- The Center option has been added to the point cloud dialog, which imports the point cloud in the center of the axes.
- In case of import file cloud of points in text format and pts if there are 7 fields, the fourth.is removed
- Decompose polygonal to lines does not generate lines < 5 pixels
- Measurement tool, now automatically deactivated if you click on an item icon
- Added DWG and PDF icons instead of text.
- Subdivision of segments with final selection and move enabled
- Extended control over the visibility on plan
- Fixed error Active layer always visible
- Added buttons in the layer dialog to swap table row positions
- Now if I change the openings it keeps the font
- Fixed bug dimensions readback, when changing natural scale was not re-read with the right size
- Recalculate text dimensions when the natural scale is changed
- Coordinates in the toolbar, now are reset at the moment of the click
- The 3D raster copy position is correctly placed in the plan.
- Other minor changes …Added the Copy and Paste point clouds
- Fixed bug in the selection of handles after moving a multiple selection and when the option “no isolated handles” is enabled
- Other minor changes ..
Domus.Cad 24.3.2
Differences from 24.3.1
Fixes and improvements
- Added the Copy and Paste point clouds
- Added LAS and LASZ formats in point cloud import
- In recent menus, if the file has been deleted it will be shown and removed from the list
- Optimized cloud import filter
- The Center option has been added to the point cloud dialog, which imports the point cloud in the center of the axes.
- Speed up the drawing, editing and zooming of point clouds in plan
- In the clouds of points without colors put neutral color instead of black
- Fixed scaling of the image from cloud when scaling is different than 100.
- The plan section now takes into account the layer in which the point cloud is imported
- Il Pannello cloud è stato modificato
- The number of points indicated in the Cloud panel is updated after deletion or simplification of points
- Controls to prevent the red rectangle of alignments from being printedCorretto Salvataggio sfondo visibile
- Checked read files pts, must be present the three vertices x,y,z
- Export dwg, added solid fills for polygons, arcs,, rectangles and ellipses
- Other minor changes ..
Domus.Cad 24.3.1
Differences from 24.3
Fixes and improvements
- The program remembers the locations of the files read or saved, separated by type, DWG-DXF, libraries, images etc., so that in the following accesses it will be placed in the folder of the recently used files.
- Fix the position of the Point Clouds in 3D views according to the cloud reference elevation and the layer elevation where it was imported.
- Various corrections in the treatment of frame with Apply Infisso. Before there were problems of selecting windows after inserting a frame, undo the operation, correspondence between plant and 3D and more.
- The Frame Detach function leaves the frame in its current position instead of placing it at the axis origin.
- Correct the representation of stratigraphy after having made operations of modification of openings.
- Added a red rectangle check for alignment between elements in the print preview. In rare cases it was reported in the final print.
- Fixed bug in default views. Before if there were no elements in the project it would make an error.
- Editing the text rectangle only with the handle at the bottom right
- Single-line->multiline text conversion now puts handles
- Multiline to single text conversion now re-updates the text correctly
- Other minor changes …
Domus.Cad 24.3
Differences From 24.2.1
Movies
For all animations present in the previous version it is now possible to create movies with different formats, up to 8k.
In the animation windows along a path that for the animation of the sun is present a section to set the characteristics of the generated movie.
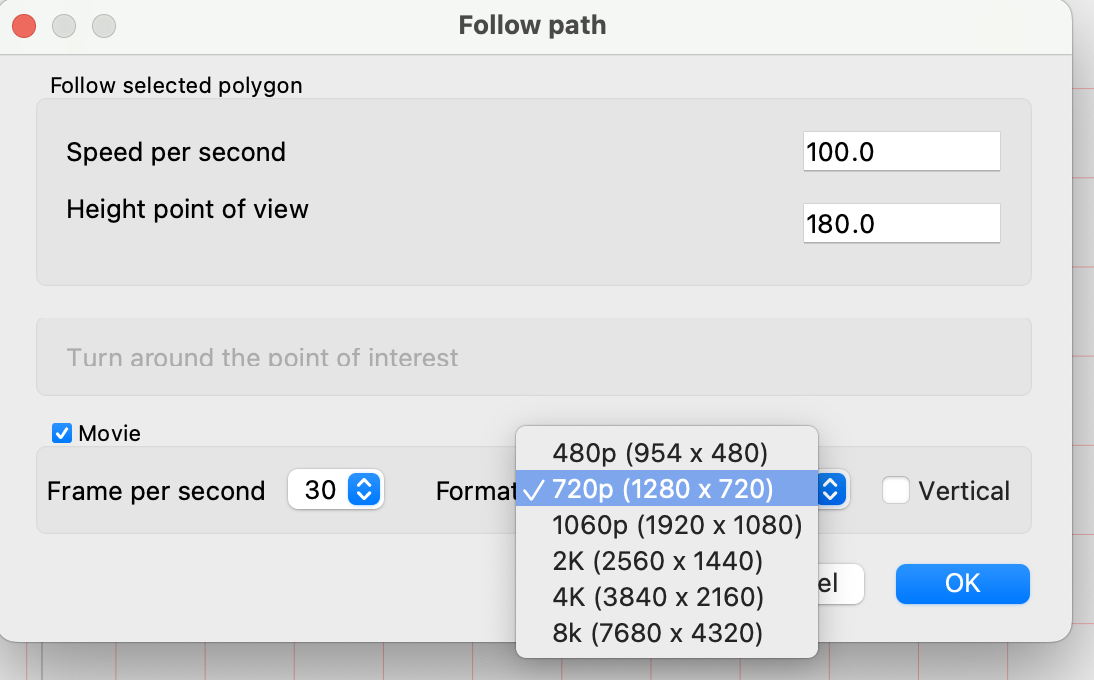
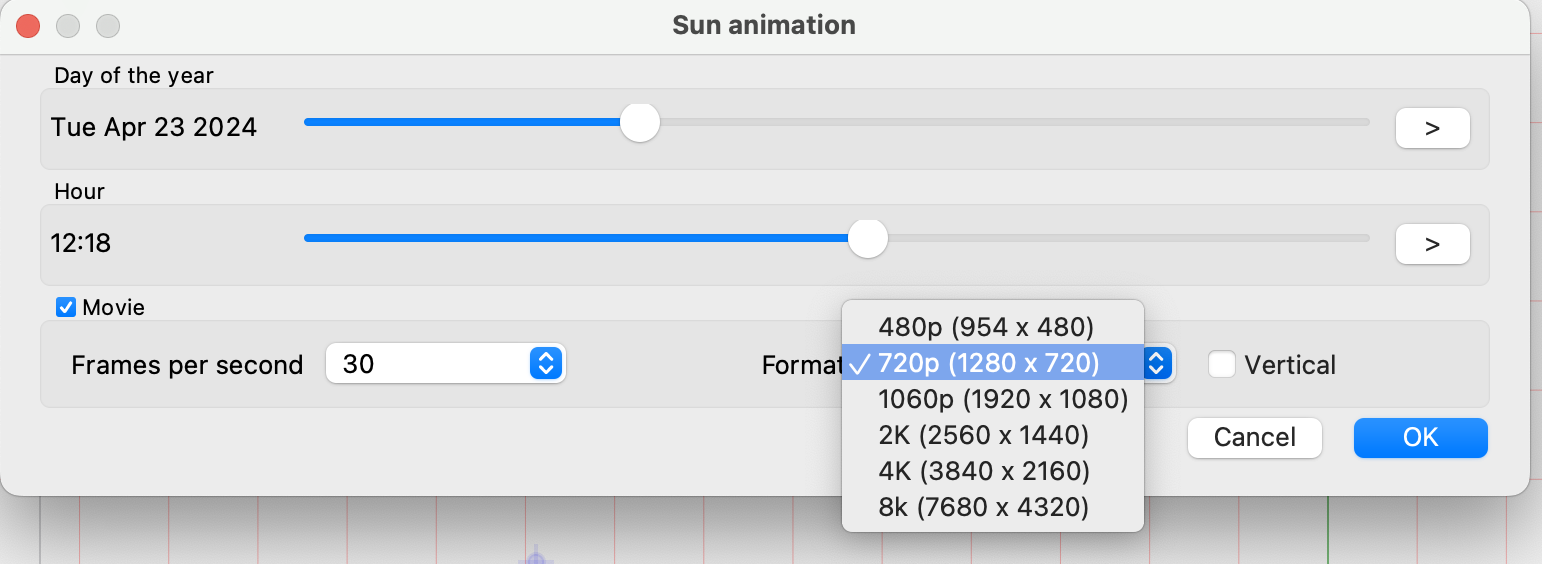
The parameters needed to generate the video are:
- Frame per second. Number of frames per second from 10 to 60.
- Frame size. 954 x 480 to 7680 x 4320.
- Vertical. If this option is selected, the format changes from horizontal to vertical.
The generation of a movie is an activity that takes a lot of time on the computer. The times can be very long depending on various parameters.
For example, a one-minute movie at 30 frames per second requires the generation of 1800 images.
Copy and paste properties
The Copy Property and Paste Property commands are accessible from the pop-up menu ant from the Edit menu. These functions were also present in the previous version, but have been extended and optimized.
Copy properties
It is applied to a selected element. All parameters, geometries, materials, colors, dimensions etc., are set as default elements to insert new elements and also stored to execute the Paste Properties command.
Paste properties
Applies to one or more selected elements of the same type as the one where you previously executed the Copy Properties command.
The parameters that modify the plan view, such as colours, grids, thicknesses, characters, etc. are pasted. The parameters affecting the dimensions and the 3D model are not changed.
The operation can be undone.
Introduction and editing of texts
In previous versions texts could be inserted in single click mode or within a rectangle. In the second case, the rectangle can be resized later with adaptation of the text inside.
In previous versions it was not possible to change this mode once inserted. Now the icons
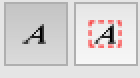
They remain visible even during the selection phase and clicking on one of them changes the mode of all selected texts.
Other changes and improvements
- IFC OpenBim. Ottimizzazione e miglioramento dell’esportazione IFC.
- Visibility of 3D objects enabled. It acts on the model generation and 3D exports.
- Accelerated double click on objects
- The default neutral material also takes into account the ambient coefficient, improving the rendering even if no materials have been assigned,
- Export dwg table, now the save window remains in the foreground
- Removed possibility to delete handles of texts
- The rotation wheel of the selected elements, in the inspection panel at the bottom, goes in steps of 1 degree instead of 15 degrees
- Application of dimensions rounding also to window sizes
- Removed the autoscroll for polygons
- On Windows applied a scaling coefficient to the click center for custom sliders and high screen resolutions
- The wall axes is no longer seen in print
- Now if I cancel the creation of films of the sun, put back as it was before
- Calculation angle between two segments or two walls, put in scene coordinates
- The menu item Follow path has been changed to Animation
Bug correction
- Resizing the rectangles of multiline texts, now it wraps correctly
- Fixed a deformation bug. Rotated texts were not repositioned correctly.
Domus.Cad 24.2.1
Differences From 24.2
Fixes and improvements
- Improved IFC export
- Corrected error in compacting segments
- Improved click on items without moving
- Fixed issue where the print area window appeared white
- Fix extrusion with default mesh height
- Hybrid view on Windows function is now synchronized
- Fixed walls in object of object
- Optimized intersections search for snapping
Domus.Cad 24.2
Differences From 24.1
Sun animation
This command is available from the Options menu and from the button at the bottom of the light panel. In both cases the following dialog box is opened:
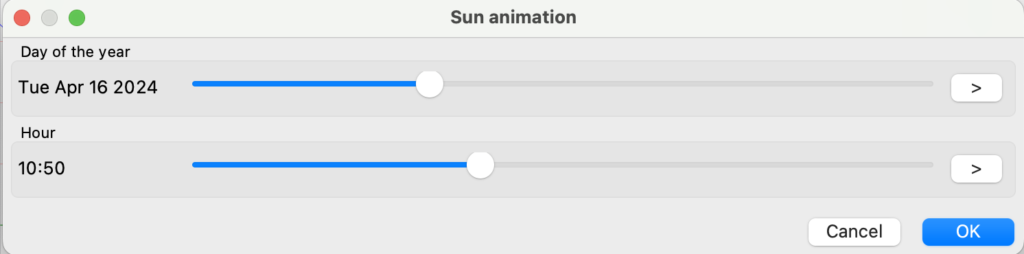
If there is a selected directional light at the time of opening, the window acts on it, otherwise it creates a new directional light.
The top slider changes the date of the year and changes the daylight day by day based on the time set in the bottom slider.
The right arrow creates an animation in the 3D window, with shadows changing day by day.
Moving the lower slider changes the light depending on the time of day set in the upper slider. The right arrow generates an animation with shadows changing during the day.
With OK, any selected light assumes the solar inclination corresponding to the time and day set at the time.
The light is generated according to the latitude and orientation of the drawing set in the Generate Sunlight dialog box.
Hybrid raster-vector views
In the vector window, the Copy command has been replaced with a menu
- Copy. Copy the vector drawing on the current layer
- Lines. Like the previous one, but only lines, without polygons
- Hybrid. Creates a composite image from the raster image of the top window and the lines of the vector window. In the case of axonometry, elevations and sections the two parts are exactly superimposed.
Detach frame
This command removes the window frame from the selected window or door. † After being detached the window is an object that can be processed and modified independently of the original window.
The command is accessible from the opening panel with the corresponding button, or from the menu Process->Automatic generations->Detach frame.
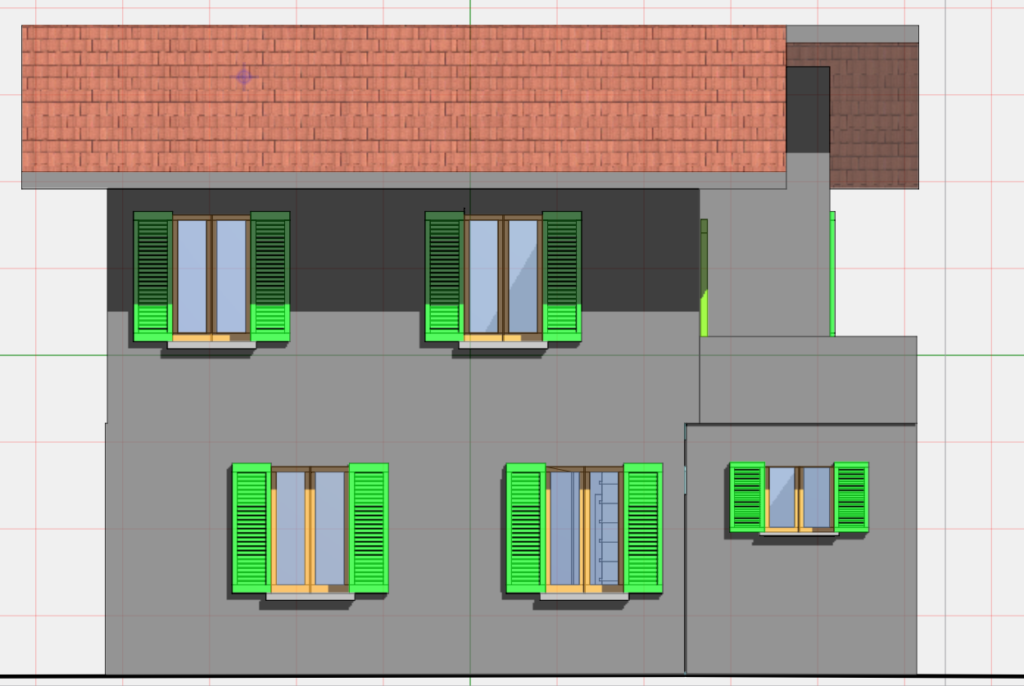
Image from selection
The Image from selection command, from the Edit menu, creates an image of the selected elements.
A dialog box allows you to choose the resolution of the image produced.
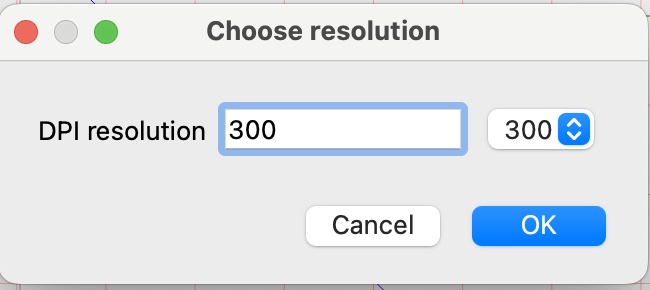
Image from the cloud
This command generates an image of the section of a point cloud. It is basically a kind of photograph on a particular position of the section. The image is much lighter than an object of points or polygons.
The command can be executed with Edit->Image from Cloud, or with the button at the bottom of the Cloud panel.
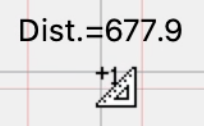
Ruler tool

The ruler tool in the top palette allows you to measure distances by clicking on a point and moving the mouse. The measurement is displayed continuously
Holding the Alt or Option key extends the information, showing distance, delta X, delta Y and angle.
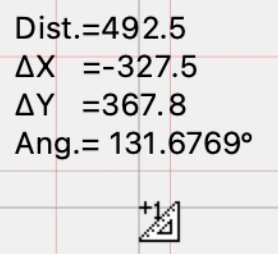
The measurement mode can also be switched on or off by pressing the L button.
Other changes
- Point clouds. In the color management in plan it is possible to display in real colors, if no specific color has been enabled.
- 3D views. In 3D views the far plane is automatically positioned after the 3D model.
- Extraction of polygons. The polygon extraction that was only applicable to point cloud sections is now also applicable to point objects, such as those resulting from copying the sections.
- Scalable Autocad fills take the color of the area, so the color can be assigned.
- Convert to segments now deletes original element
- Print window. The print window remains in front of the work window only and not all open windows as was previously.
- MapToCad. The image is selected, movable, zoomed in, the palette is positioned on images and the panel on images.
- Improved dark-mode management
Fixes and improvements
- Many improvements on the management of parametric frames and on application frames
- Improvements in the management of material names with controls to avoid duplicating the name
- Fixed error in moving multiple selection of objects
- Improved 3D generation of folded and deformed elements.
- Fixed circle latching when a scaling was present
- Now only the error-free faces of the Vector Render are stored
- Fixed undo-redo of vertex deletion of a trimesh
- Fixed undo-redo moving vertices rectangles, circles and scales
- Now even if I move a vertex of the hole it is updated 3d model
- Correct IFC wall and floor thickness measurement unit
Domus.Cad 24.1
Differences From 24.0.2
Cloud-contour-lines
This feature is only available for Domus.Cad Pro.
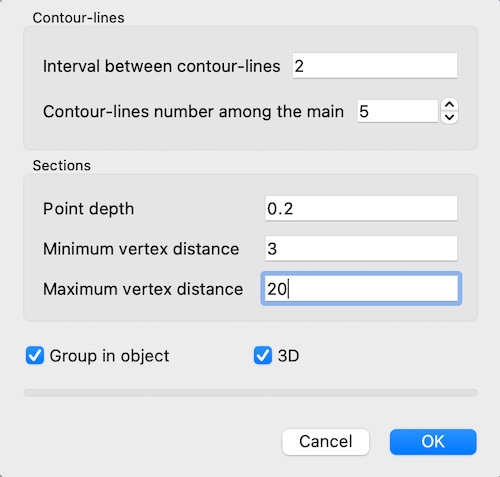
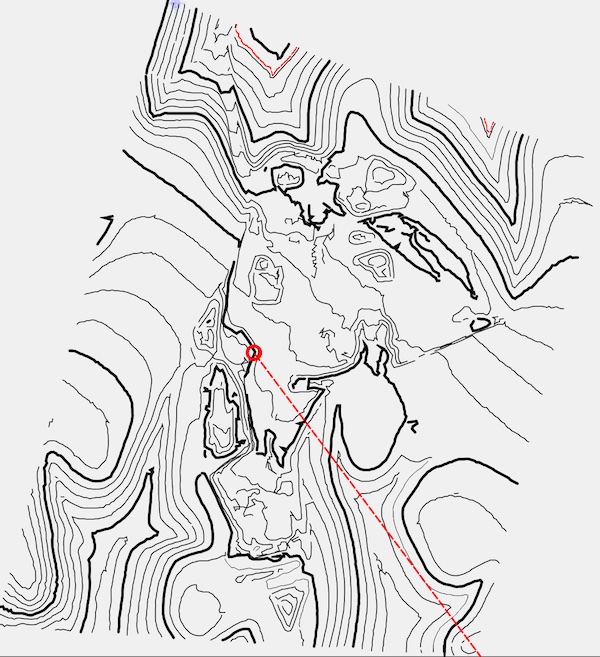
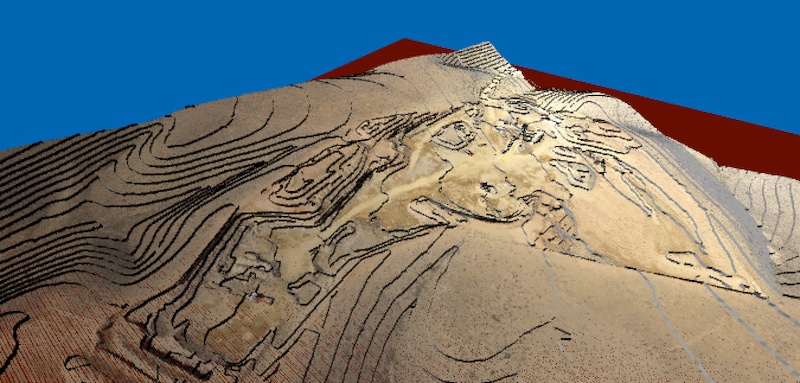
This module allows you to generate contour-lines from a selected cloud of points.
The module is useful for point clouds of a terrain and generates curves with equal height based on a series of parameters in the following dialog:
See above and see below
The View above and View below options in the Cloud panel enable or disable visibility of the point cloud relative to the section plane.
Generate object
The visible section of the point cloud can be get and stored in two ways: as points and as polygons.
Points
Through the “Points” button of the Cloud panel is generated an object containing the points displayed in the active section.
Points are Domus.Cad Point elements, you can snap to them if the attack to the vertices is active.
If the object is separated, the points can be selected, edited, moved and deleted.
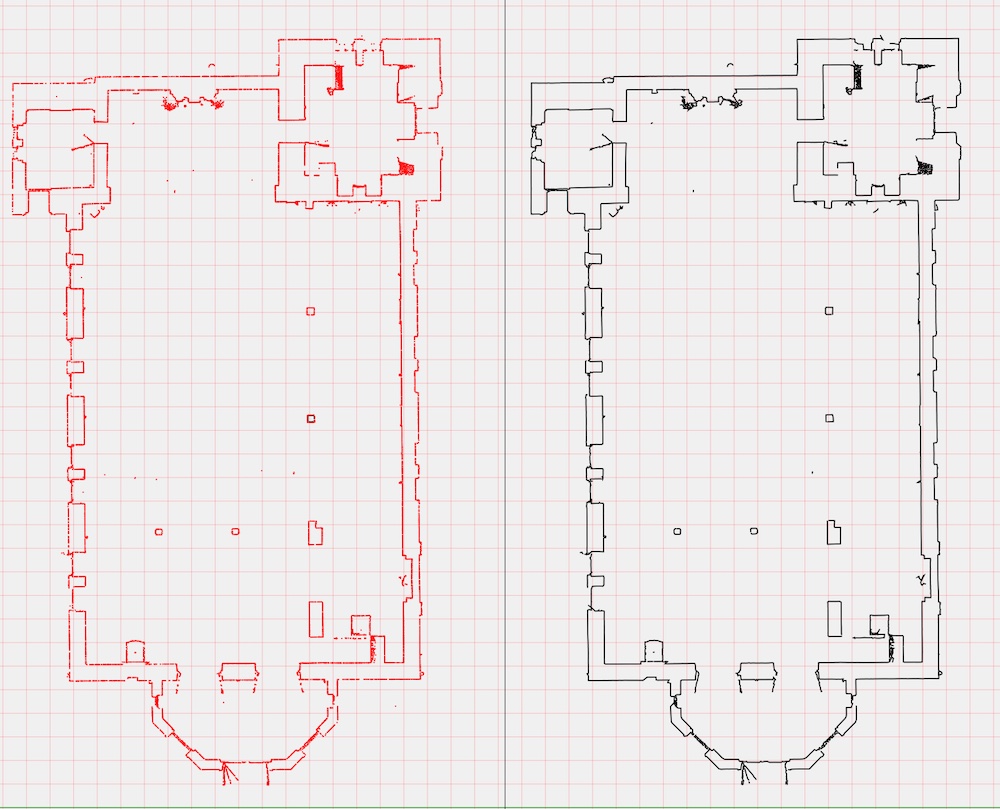
Polygons
This option extracts a series of polygons from the cloud of points, combining, according to some parameters, the neighboring points.
The parameters are chosen using the following dialog:
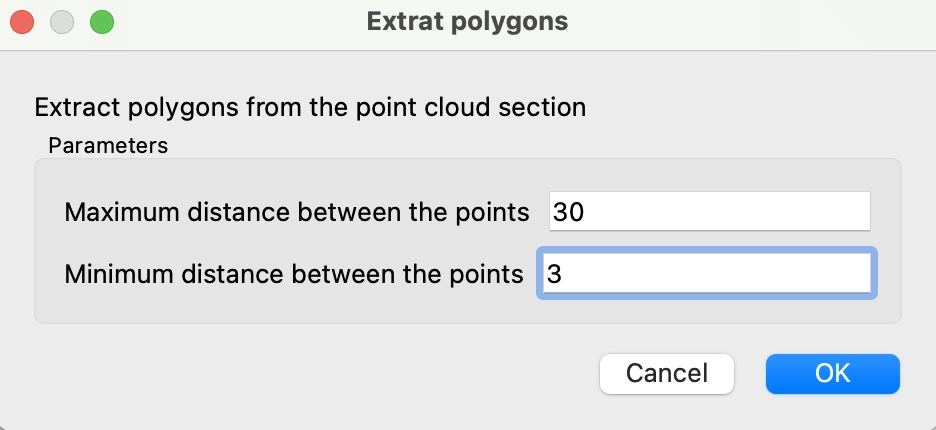
Clicking OK generates an object composed of polygons as in the example below, where on the left there is the section with points and on the right the one with polygons.
Movie
See the movie below Point Cloud Part 2:
Follow path
This command allows you to perform a 3D view animation based on a preset path in two different modes:
- Following the path of a selected polygon
- With a 360 degree turn around the center of view
Follow selected polygon
If there is a selected polygon, the following dialog appears:

The path is followed with the speed indicated for each second. In figure 100 cm/sec, corresponding to 3,6 Km/h or 22 M/h,
The path is followed by the camera at the indicated height and the observed point at the same height of the camera.
Around the center
If no polygon is selected, the control rotates the camera position around the observed point with a full 360 degree rotation.
The heights of the point of view and the observed point remain those set when the command is executed.
Recording of a movie
Domus.Cad does not create a movie, but you can record in a movie the animation created with this command using the functions in Windows and Mac Os.
Windows
If your PC is equipped with Windows 11, you can record the screen easily via the Capture Tool application. After starting this program, select the camera icon, draw a rectangle around the area you want to record, and click the Start button to start video capture.
With Windows 10 can be used the application Xbox Game Bar, which allows you to record mainly video gameplay of games but can also be used for any other application.
MacOs
You can create a movie of the entire screen or a portion by pressing Shift-Command-5. A palette appears where you can choose whether to save an image or record a movie. To stop the movie, click on the Stop icon at the top right of the menu bar.
Alternatively you can use the QuickTime Player application with the command New Screen Recording.
More information on how to register
https://www.tomshardware.com/how-to/screen-record-in-windows
https://support.apple.com/en-us/102618
Resample image
Changes the resolution and color depth of the selected image.
Images with too high resolution take up memory and slow down the program unnecessarily, so reducing the resolution can be useful. For example, it is useless to have an image with a resolution of 1000 dpi (dot per inch or dots per inch). A resolution of 150 dpi is sufficient for inkjet printing and 300 dpi is good for quality printing.
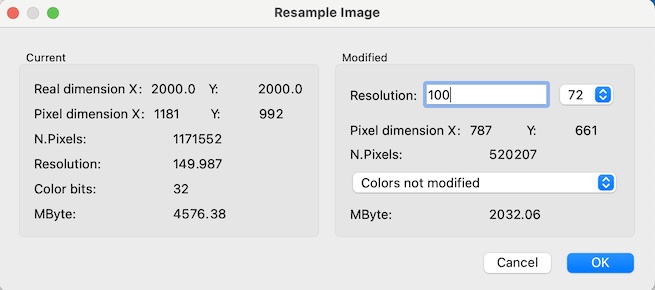
In the left part are shown the characteristics of the selected image and in particular:
- Actual dimensions in X and Y direction. They are the actual dimensions considering the scale of the drawing
- Pixel dimensions
- Total number of pixels of the Image
- Resolution in dpi
- Color bits. It’s the number of bits per pixel. 32 bits corresponds to millions of colors (4 bytes) and 1 bit for black and white images.
- Mbyte: memory occupied by the image in mbyte.
In the right part you can choose the resolution of the modified image and the color depth.
The color depth can be: black and white, grayscale or unmodified colors.
The last option does not change colors from the original image.
Depending on the choices made, the size in pixels and the occupied memory of the modified image are shown.
In the black and white image the gray levels are transformed into many small black dots with a technique called dithering.
Measures
In the vector window you can measure distances and angles. These measures make sense when the view refers to elevations, sections and axonometrics, because in perspective the distances are distorted by the perspective effect.
When the mouse cursor is over the vector view a label continuously shows the distance from the last point clicked.
To take a distance simply click on one point and move the cursor to the other point.
When the cursor is above the vector window, the measurements and angles shown in the status bar at the bottom refer to the cursor position relative to the window itself.
Fixes and changes
- Removed orthogonal snap when more than one handle is selected
- Reorganized the visibility of the function panel according to the current operation
- Added stretching icon in object functions
- Adjusted the various material menus with stratigraphic materials. After reading the stratigraphies were not updated
- Improved control of the trackpad, MagicMouse and wheel in the mouse in the window zoom. Previously there were problems controlling the zoom speed.
- Control for modifying slab materials with only two vertices, without upper and lower surfaces. He made a mistake in changing the material
- Zoom on all performs a sheet zoom if no visible items
- Dxf/dxf separation, now invisible layers are not placed in the scene
- The sensitivity of the perpendicular and parallel snaps is now linked to the scale
- Fixed bug moving walls with windows by a handle
- Corrected diagonal hatching offset. Not applied correctly. Also did not take well the step from the stored hatches
- Fixed handle wall selection bug. Before lost selection
- Set default views. If name is empty does not accept them
- Obj file materials removed spaces
- Moving multiple selection now does not lose walls
- Fix to Super2Dto3D – Misspelled segment with ellipse and rounded edges. Now rectangle is not beveled and ellipse is
- Correct movement of the dimensions with the darts. It changed the texts to 5 cm
- Correct rotation of clouds of points, before rotated all those present not those selected
- Added control on walls to avoid error after deletion
- Separation of thousands in number of cloud points
- Snap enabled on vector view
- Fixed error clicking in 3D selection of a point cloud
- Zoom on everything now also works for elements outside the work area
- Fixed Super2Dto3D. Also smoothed rectangular sections
- Fixed rectangle bucket bug. In some cases tracing rectangle made error
Domus.Cad 24.0.2
Differences From 24.0.1
Fixes and changes
- Fixed a problem when moving elements along with a handle of rectangles, arcs or circles
- Added controls to avoid wrong window and door movements in multiple selection
- Fix to dimensions being moved to multiple selection
- Check for reading images. Discard incorrect images
- Prevented operation of mouse wheel or trackpad if mouse is pressed, to avoid problems with MagicMouse
- Fixed cloud rotation bug points. In some cases by setting the rotation the cloud was moved randomly
- Forced area recalculation for polygons when changing attributes to text
- Recalculation bounding volume after cloud rotation points
- Fixed section line bug, sometimes wrong section location
- Other minor changes …
Domus.Cad 24.0.1
Differences From 24.0.0
Fixes and changes
- Switching from selection to drawing mode, deselects all items. Previously, if some elements remained selected, problems could arise.
- Avoided flickering by moving with the arrow keys.
- Fix to point cloud import. Now no longer mirrored
- Removed some tooltips that were annoying on Windows
- Text angle now takes the real not the integers
- Corrected scaling error in axonometric copy
- Enter controls to remove any rectangles and ovals with zero dimensions
- Other minor changes …
Domus.Cad 24.0.0
Differences From 23.0.15
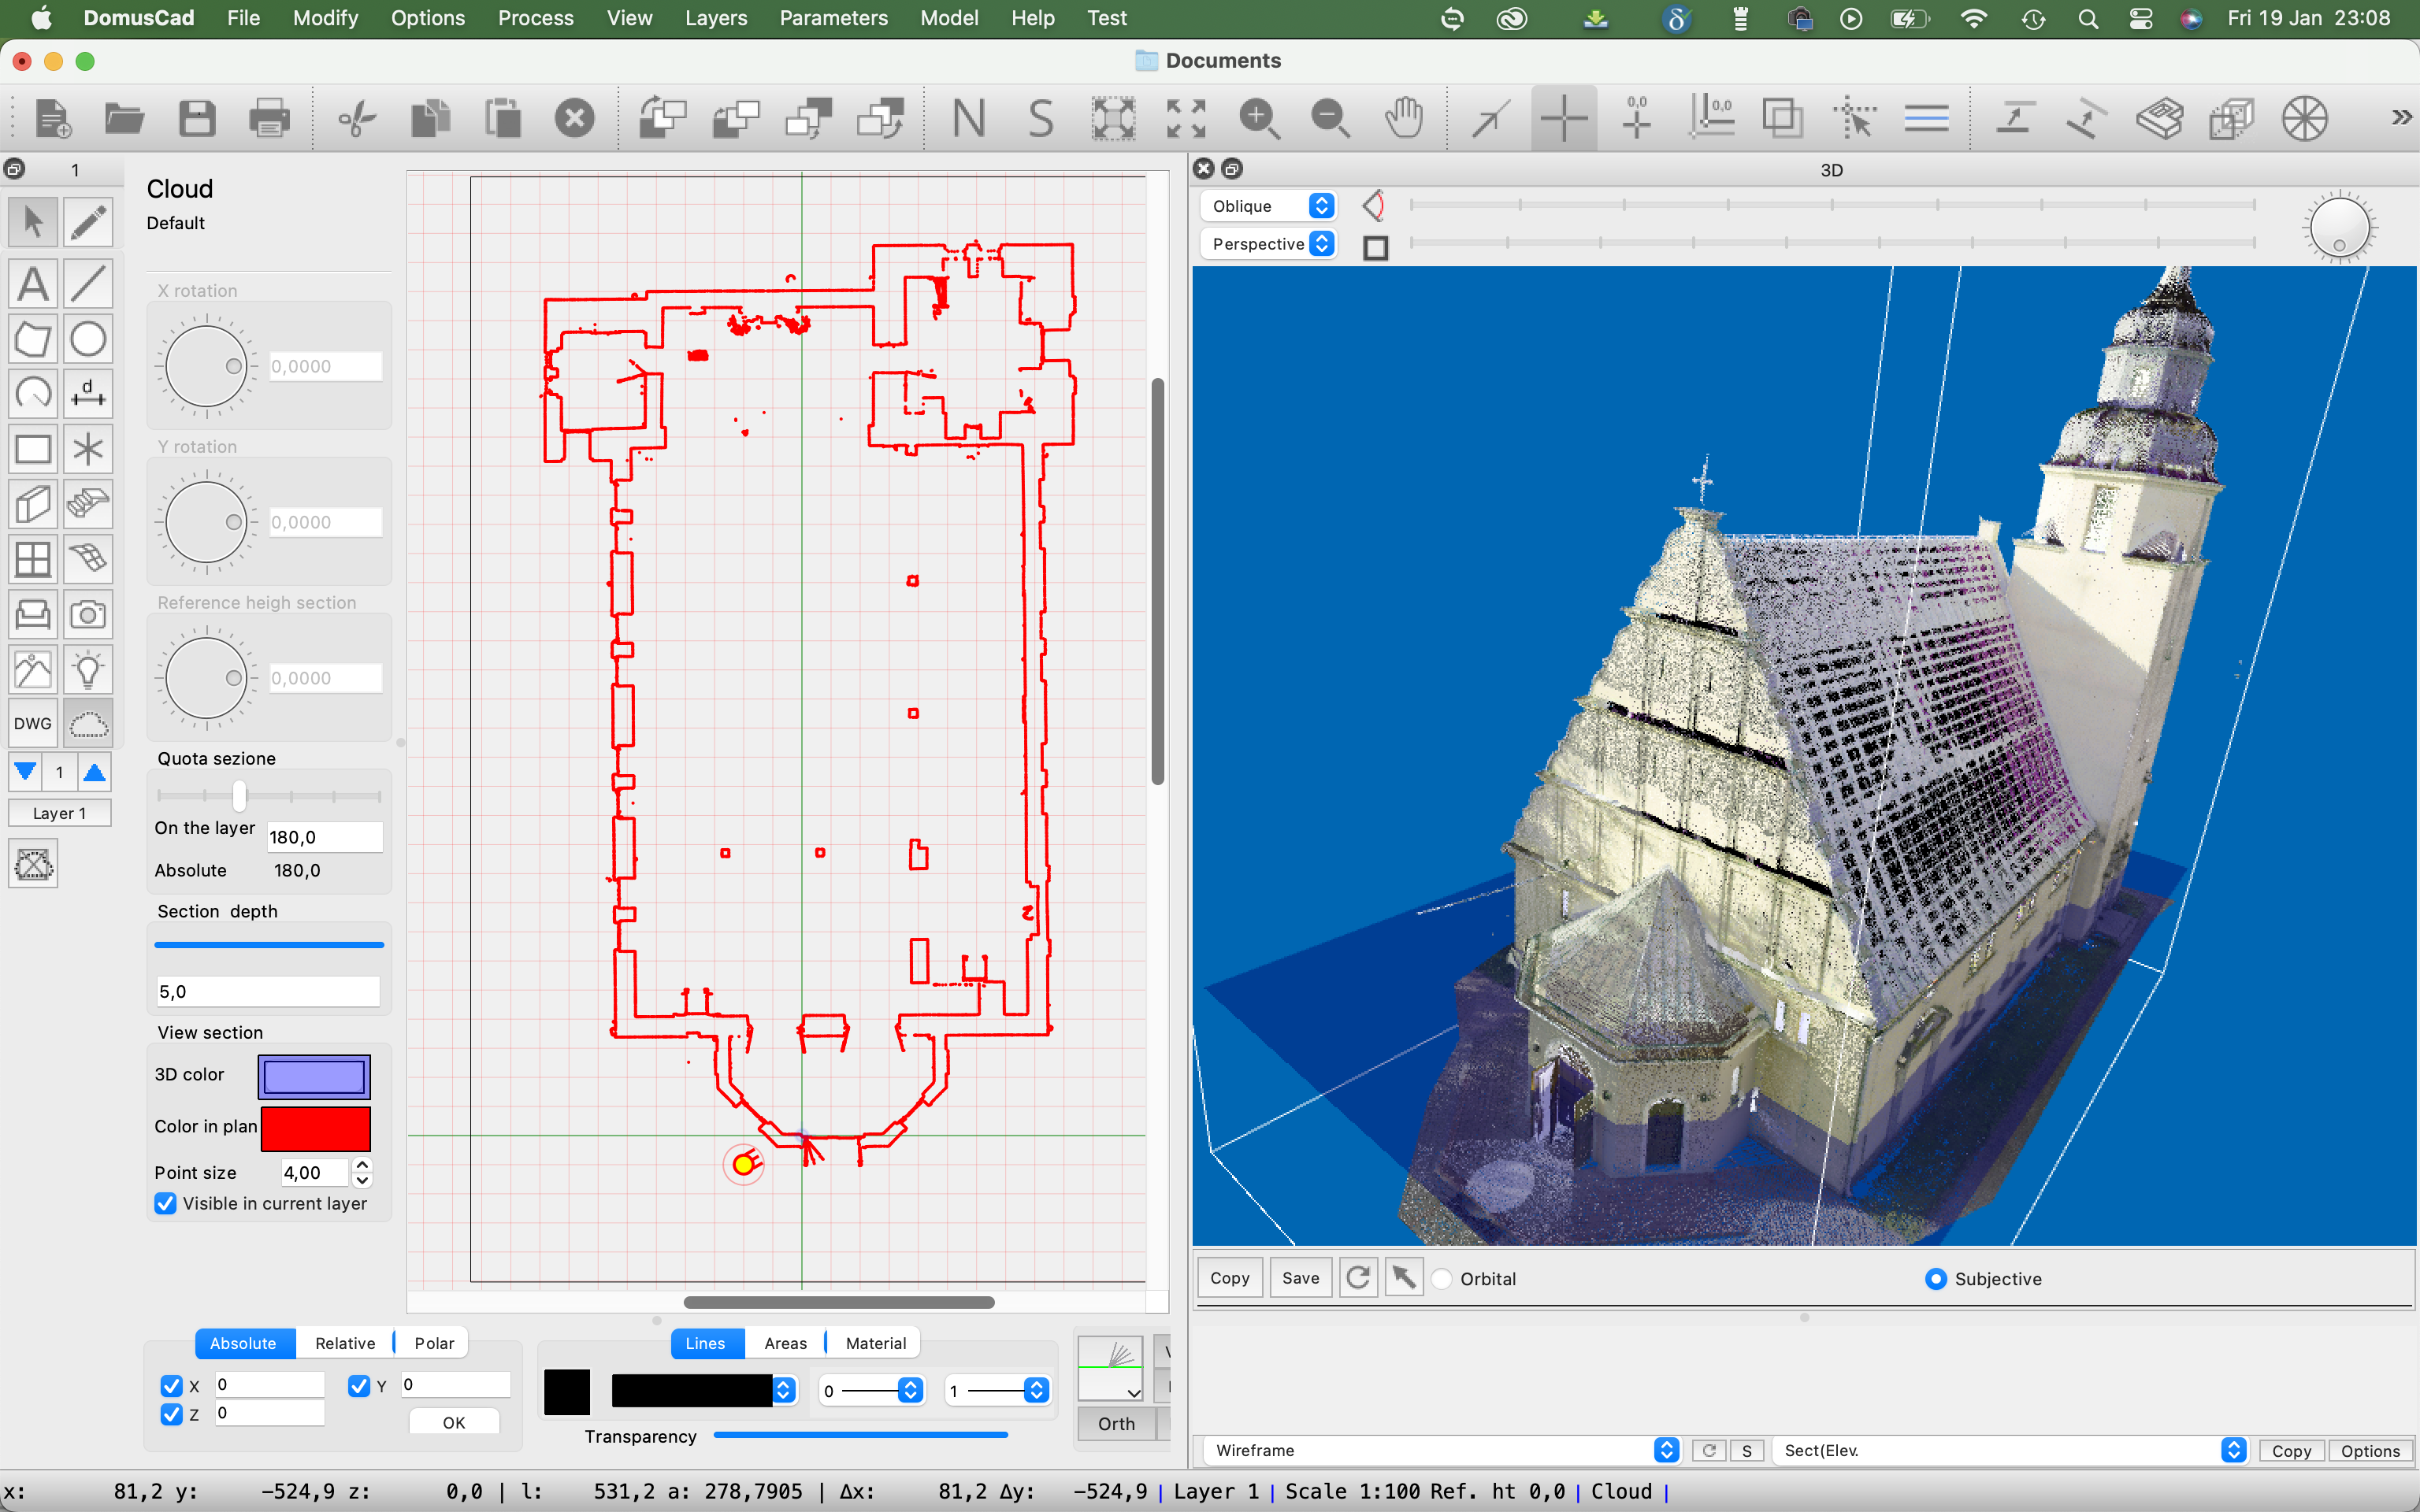
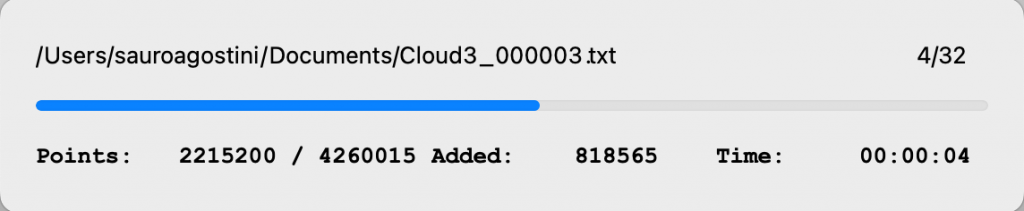
Point Clouds
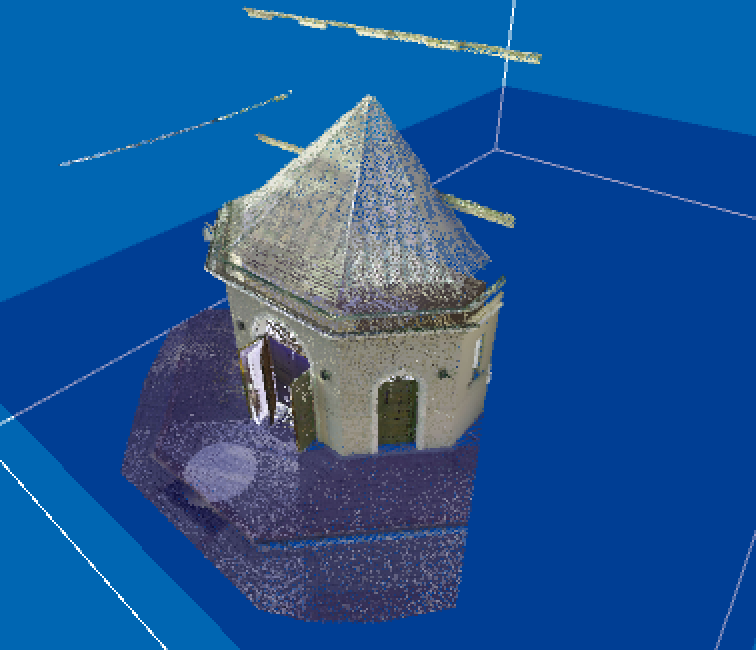
The most important novelty is the point cloud management (Point Clouds the English term) integrated into the BIM project. The previous version had the CloudsToCad module, but it treated the point clouds separately from the project.
The point cloud is a basic element of Domus.Cad, such as mutes, doors, windows, stairs etc.
This first version is still in the beta-test phase and may contain malfunctions, In that case please report them to Interstudio.
For now it is available for both Domus.Cad Pro and Domus.Cad Std. Domus.Cad Std will then provide a part of the functionality, while the complete management will be reserved to Domus.Cad Pro.
For a detailed description please read the chapter Point Clouds in the manual.
Import
Point clouds can be imported in various formats, also formed by multiple parts.
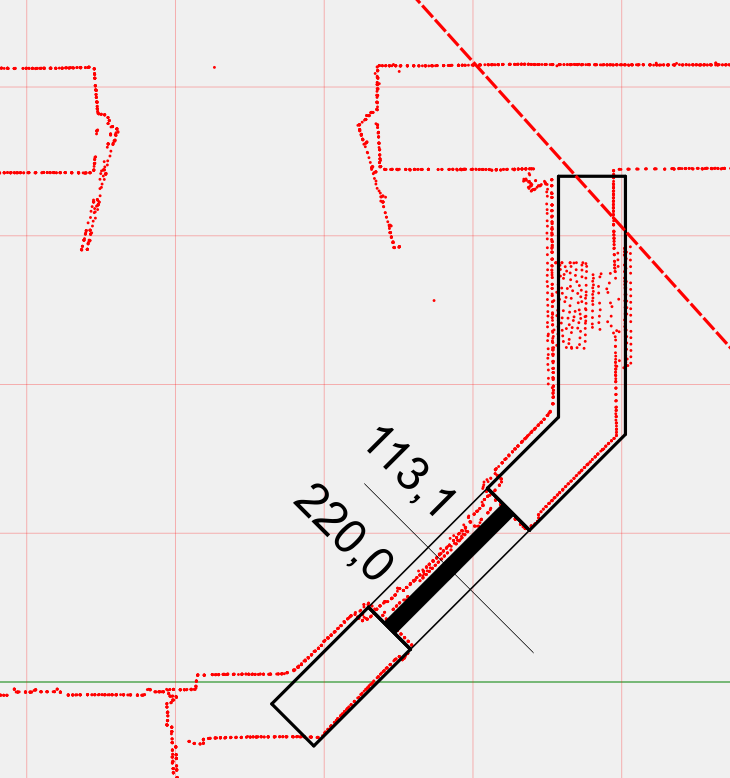
Automatic sections
After the point cloud is imported, the horizontal sections for each defined layer are automatically generated..
The sections are generated at an altitude of 1.5 m from the layer, which is normally fine for dissecting openings, but you can change it interactively via the Cloud panel described below.
The section plane is also represented in the 3D view, so you can see where it cuts through the building.
On the section can be inserted elements such as walls and windows.
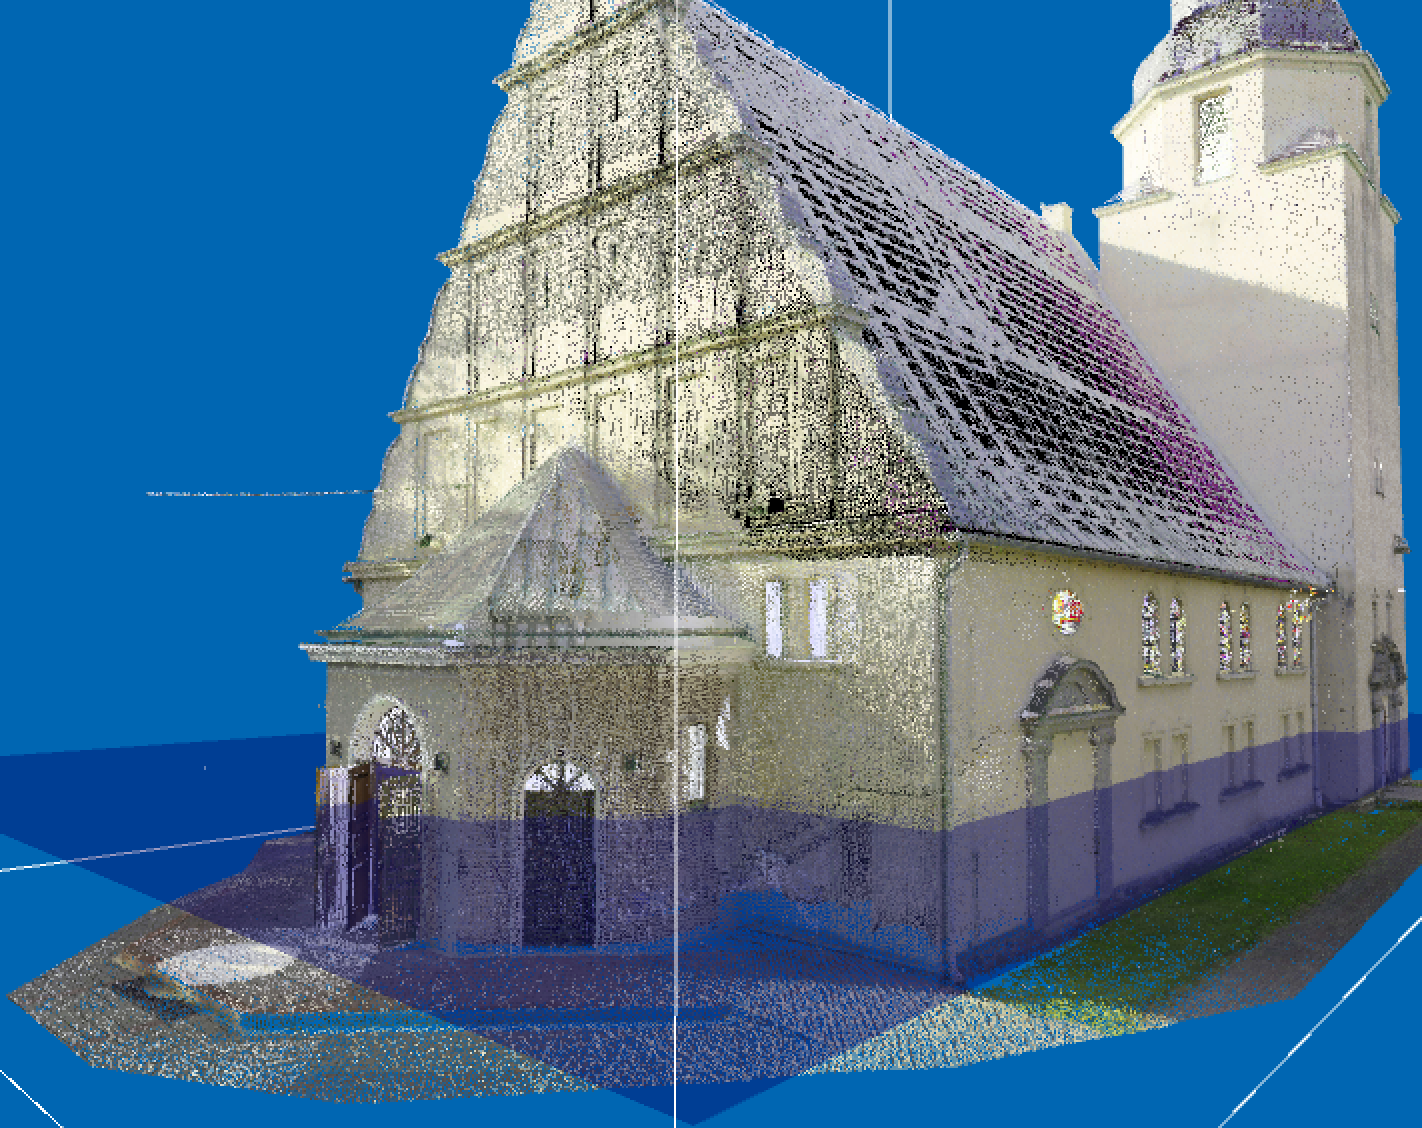
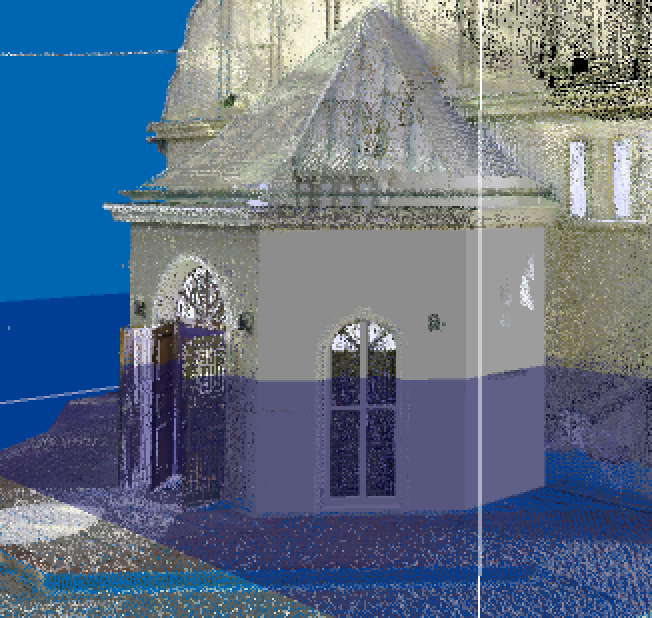
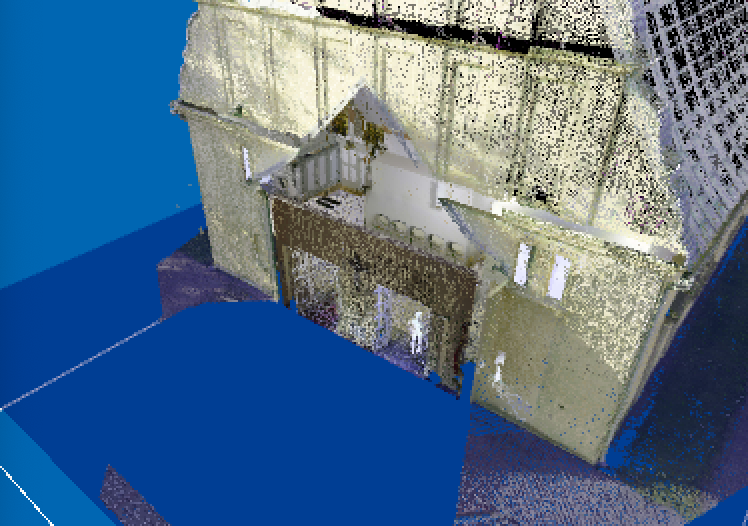
The architectural elements are also visible in the 3D window, superimposed on the cloud of points, with an immediate verification between the inserted elements and the survey.
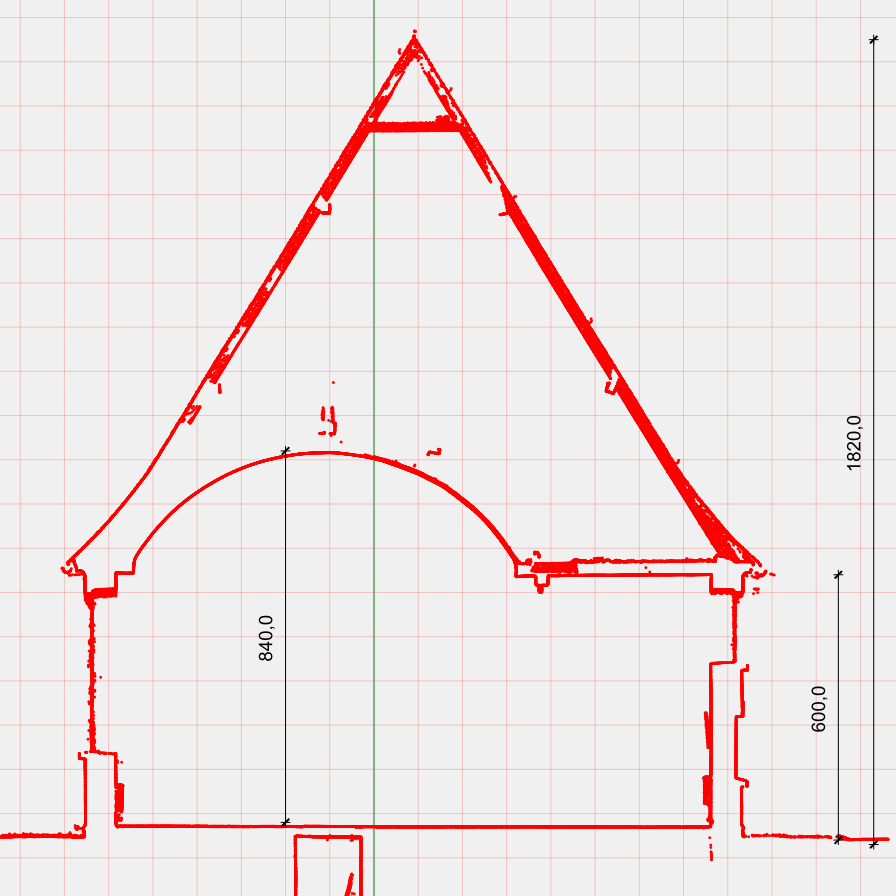
By rotating the cloud 90 degrees you get vertical sections exactly in scale, with real dimensions.
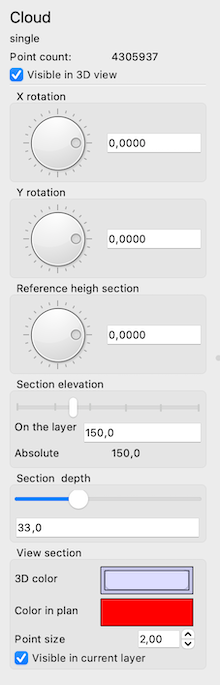
Cloud panel
Point cloud management is mainly done from the Cloud panel. The panel is activated by clicking on the Cloud icon in the elements palette ![]() .
.
For a detailed description please read the chapter Point Clouds in the manual.
Operations on Cloud Items
Most operations can be performed with Cloud elements. Here is a list of possible operations: Move, Rotate, Deform, Mirror, Roto-Translate, Align, Delete.
Some operations cannot be performed: Group in object, Copy and paste, Duplicate and process with offset.
Deleting points
The points that make up a cloud can be erased by polygons, circles and rectangles.
To obtain the deletion you must select a Cloud element and the geometric figures that serve for the deletion.

By clicking on the points deleting icon,![]() , the dialog with the various options appears:
, the dialog with the various options appears:

The point deletion can be internal or external to the selected geometric figures, the Apply button previews the effect.
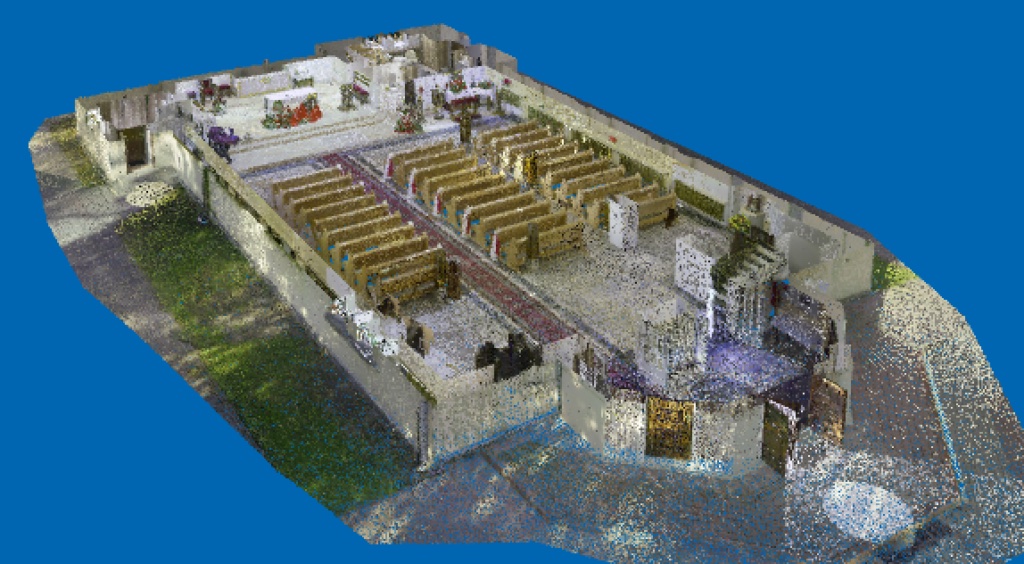
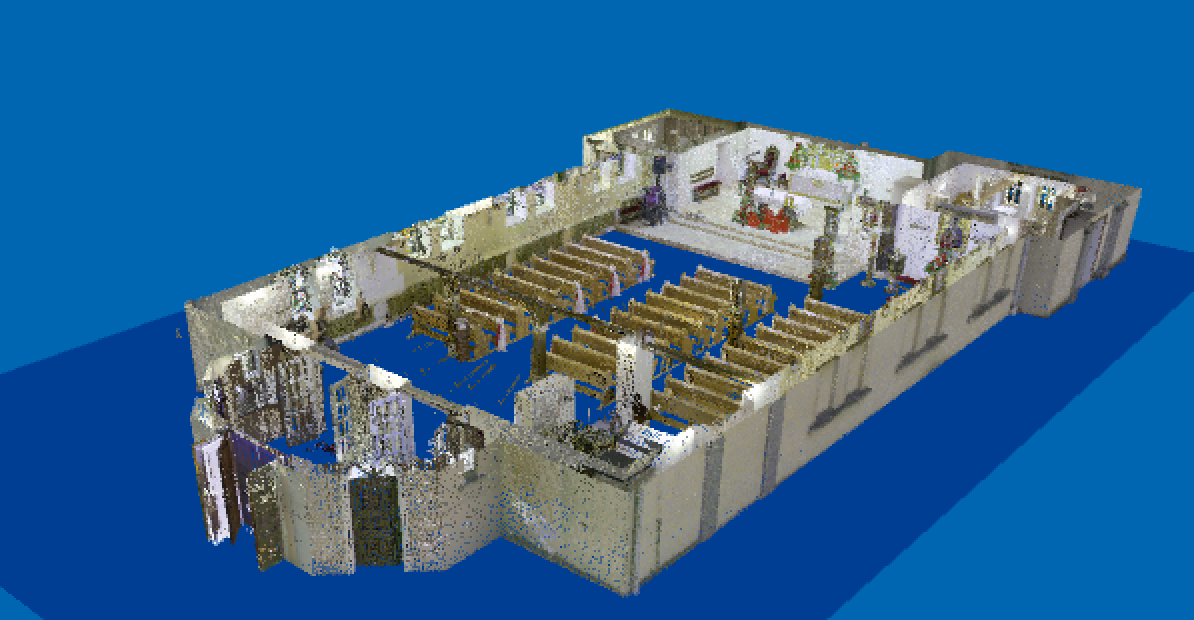
In the example below, all points have been deleted, except those of the apse, with the option Outside.
In the following case, however, through the option Inside, the points of the apse were deleted from the church.
In the following case an interval in height has been defined, so as to see the interior of the church.
By clicking on the Simplify option, a field appears to introduce the minimum distance between the points.
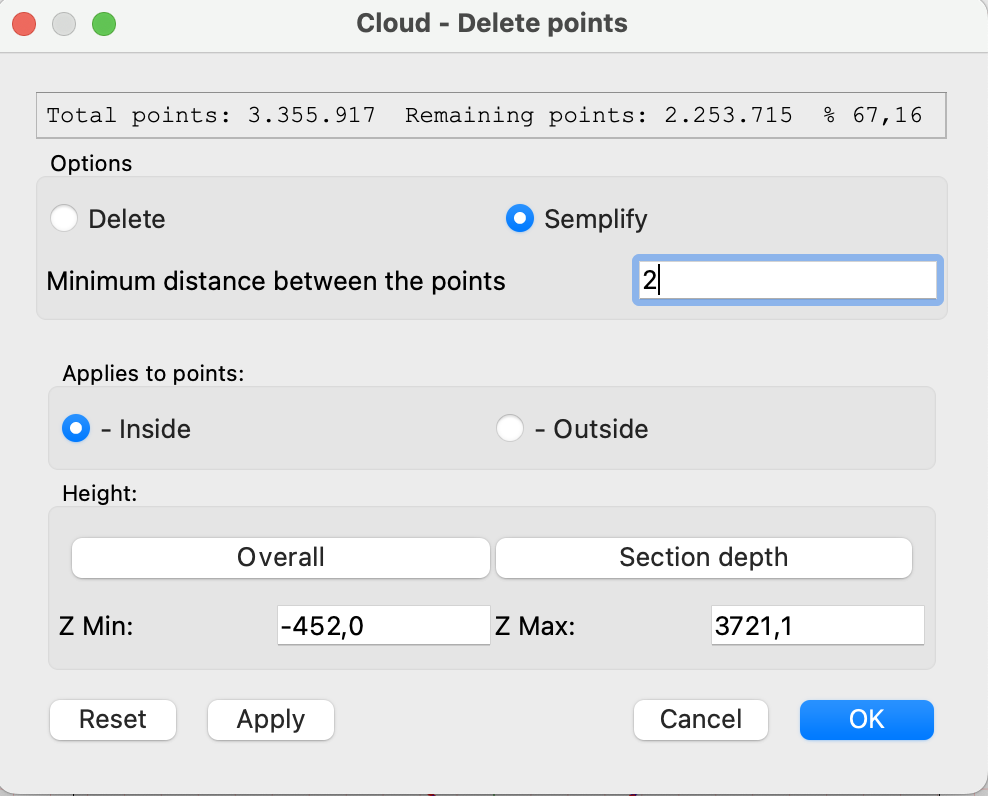
The simplification is done by deleting all the points closest to each other of the minimum distance, thus decreasing the density of the points of the cloud.
Also here the erased points can be external or internal to geometric figures or within a range of heights.
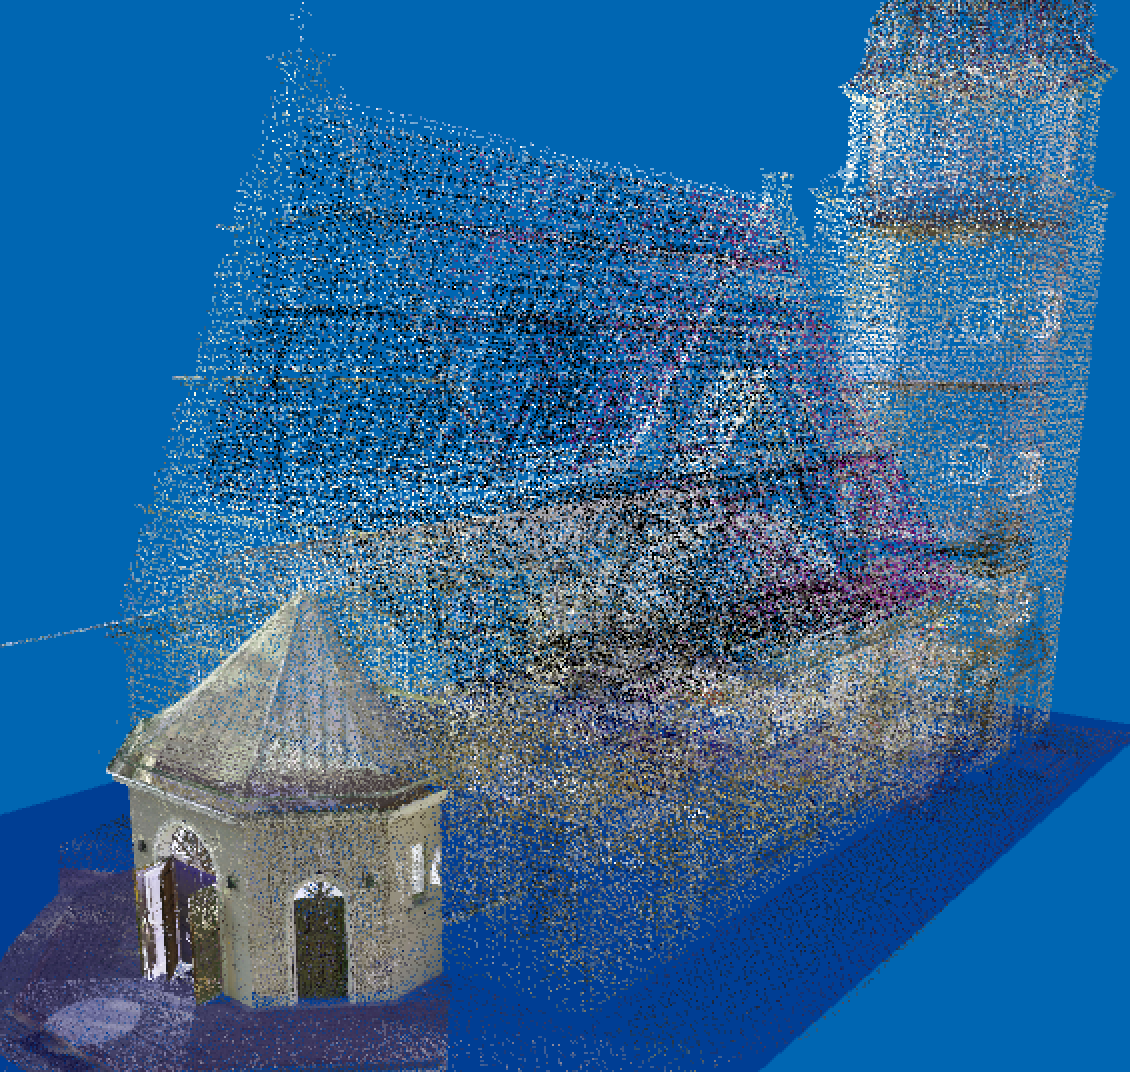
For example I can leave all the points of the important part and decrease those outside, to give an idea of the entire survey.
In the figure below the apse was left with all its points, while the density in the rest of the church was decreased.
See the movie >
Improvements
In the object panel, the “Visible in 3D view” option has been added to manage the visibility of objects in the 3D window.
Corrections and changes
- Changed the 3D representation to axonometry. Now it takes into account the relationship between the dimensions of the view.
- Fixed some Undo-Redo
- Analytical position calculation for default 3D views
- Removed extension attach for zero thickness walls
- Corrected the height of parametric frames in walls > 0,
- Correct change of wall dimension for parametric frames and object frames
- Correct window visible in vector rendering
- Clear mesh and polygon points even when the item is selected
- Optimised the 3d upgrade of walls
- Fixed 3d bug, if I move walls with fames objects now in 3d are fixed
- Fixed bug deleting fixture object in the opening. Before if I moved an extreme window after deletion it made error
- Correct aligns to segment. Forced axis snapping during operation.
Domus.Cad 23.0.15
Differences From 23.0.14
Improvements
- Camera. In the room panel you can choose to display only the icons of the room and the observed point.
- Tile fills. They are only displayed above the chosen scale in the plan parameters.
- Select and move. Many operations to select and move many items have been optimized and speeded up. The changes are particularly noticeable with heavy work.
- Speeded up rendering
Corrections and amendments
- Fix to Undo/Repeat item movement
- Updating the visibility of wall ends after a change
- Reset rotation with Ctrl or right key in subjective navigation
Domus.Cad 23.0.14
Differences From 23.0.12
XYZ import
It has been added the function of importing a series of points X, Y, Z inserted in a text file type CVS, with fields separated by Tab, commas or others.
The function is called from the Plan menu with Plans->Import->XYZ.
After choosing the command, the following dialog appears:

The window allows you to define exactly the import format, indicating for each column the type of data present.
If there are no significant columns in the imported table, they can be ignored by choosing Ignore.
The Separator menu allows you to define which separator is used to separate the table data columns: Tab , : ; Space
It is also necessary to indicate the unit of measurement of the data to be imported.
Points are imported and represented on the current plane with the marker and the current default scale, defined first in the dot panel.
After importing the dots are manageable via point panel.
Points panel
Two new options have been added to the dot panel: Scale and Show Height.

- Scale. Change the marker scale of the point. Ex.

- Show height. If this option is enabled the height of the point is indicated next to the marker:

New Floor Dimension symbol:

This symbol is useful to indicate in plan the quota of an attic, es. ![]()
Improvements
- Automatic saving. In addition to the parameter of the number of clicks, the time value, expressed in minutes, has been added. The automatic saving takes place when the number of clicks or are reached after the indicated time. If the time is 0 this option is ignored.
- ObjRot module. Enabled rotation on local origin.
- Select and move. Many operations to select and move many items have been optimized and speeded up. The changes are particularly noticeable with heavy work.
Corrections and amendments
- Saving Operating Environment: Correct saving window position
- Copying and pasting between two documents now works even if the program is closed completely and reopened later.
- Fixed moving handles of rotated elements
- Fix to various Undo/Redo operations
- Correct image rototranslation
- Objects do not snap by clicking on an internal item with object is not selected. Corrected.
- Moving opening handles. Now snap ok and movement following the grid.
- Fix to some default saves
- Fixed mesh cropping, in some cases wrong calculation
- SuperRot correction, did not close closed polygons and closed figures
New articles and tutorials

